Introduction
The department tree in FTE Tree is the core organizational structure for your account. It serves as the hierarchy under which positions, users, approval workflows, and job codes are organized. In accounting terms, it can be compared to a chart of accounts with locations and cost centers.
The department tree is flexible and supports any hierarchy your organization needs, whether you have one department or thousands, with a shallow or deep structure. Although you can change the department tree at any time, we recommend reading through this documentation first to plan a well-thought-out setup.
Note: You can customize the default name of 'Department' within FTE Tree to something more suitable for your organization, such as cost centers, locations, or business units. This documentation will refer to it as 'Department'.
Before configuring your department tree, please consult this documentation and consider the implications for how you assign users, job codes, and other settings within FTE Tree. Please contact us with any questions on how to best set up your organization.
The Department
The department is the core organizational unit within FTE Tree. Positions are assigned to specific departments, and a department may have its own approval workflow independent of other departments. Permissions to view and update positions can also be managed by department.
You can create a highly customized tree structure, similar to organizing files into folders on your computer. Departments can be added and grouped as needed, and positions, users, and approval workflows can be assigned to any department or group of departments. Typically, positions are assigned to the leaf nodes of the department tree, but you can also assign positions to branch or root nodes if desired.
Department Tree Settings
To edit your department tree, click on the name of your organization under 'Settings' on the navigation bar, then click on the 'Department Tree' tab and select 'Update Department Tree'.
General Settings
-
Department Name: The name of the department as displayed throughout the application. The name must be unique across your organization.
-
Parent Department: The parent of the selected department. If the selected department does not have specific values assigned, it will inherit values such as users and approval workflows from the parent department. The system prevents circular references when changing a department's parent. A department cannot be set as a child of one of its own descendants. If a circular reference is detected, the change is blocked with an error message.
-
Available to Assign Positions: Enables users to assign positions to the selected department. This is typically enabled for leaf departments with no children, but you can enable it for other departments if needed.
-
Include in Breadcrumb Label: Includes the department name in its breadcrumb label for easier identification. For example, if you enable this for an 'Administration' division, the breadcrumb label for a 'Marketing' department under it will be 'Administration / Marketing'. If the department itself is being displayed, this setting is ignored and the department name will be shown regardless.
Note: To maintain data integrity, departments with assigned positions cannot be deleted. If you no longer wish to use a department with assigned positions, disable the 'Available to Assign Positions' option to hide it from use.
Department Role Users
This feature allows you to assign a specific user to a role and map it to a department. When an approval request is made, the associated workflow uses the mapped role to assign the correct approver based on the department.
-
When configuring approval workflows, you can assign a role, such as a director, to the workflow. When a new approval request requires approval from a director, the workflow will identify the department in the request and select the director assigned to that department role user as the approver.
-
Parent departments with assigned role users will also be included in the approval workflow, allowing a director at a higher level in the department tree to automatically propagate down to child departments. These inherited role users are displayed on the form for your information. To change them, click the update link to be taken to the parent department.
-
Roles cascade down through the department tree. Any role assigned to a parent department will also apply to sub-departments.
Department Job Codes
This section defines which job codes are available for use in the selected department. Job codes must be explicitly mapped 1:1 to a department; there is no hierarchy or cascading of values. This ensures that job codes and their associated wage rates are only visible in the departments where they should be used.
Job codes can also be mapped back to available departments, as described in the job code settings documentation.
Approval Workflows
Approval workflows can be assigned anywhere in the department tree and cascade down to child departments. You can assign a specific workflow to the top of your department tree and let it cascade to all child departments, or assign specific workflows to individual departments or branches. The update form will indicate which approval workflow is assigned and its origin department.
In FTE Tree, an approval workflow must be assigned to a department for users to make approval requests. Additional information on configuring and using approval workflows is available here.
GL Strings
GL strings allow you to associate General Ledger (GL) coding with each department. You define the segments that compose your GL string, create the allowed values for each segment, and then assign values to individual departments. The composed GL string is built by joining each segment's assigned value in display order.
For example, if your organization uses three GL segments (Fund, Cost Center, Account) with a dash separator, a department's GL string might look like: 1000-50-4110.
GL string settings are found under Settings > Department Settings > GL Strings. You must have the "Department Settings" permission to manage GL segments and values.
Managing GL Segments
GL segments define the component parts of your GL string. Each segment represents a category such as Fund, Cost Center, or Account Code.
To create a new segment, navigate to Settings > Department Settings > GL Strings and click Create New Segment. The following settings are available:
-
Segment Name: A descriptive name for the segment (e.g., "Fund", "Cost Center"). Must be unique within your organization.
-
Display Order: Controls the left-to-right position of the segment in the composed GL string. Segments are joined together in this order.
-
Separator: The character used to join this segment to the next one in the GL string (e.g., "-" or "."). Defaults to a dash.
-
Required: When enabled, departments must have a value assigned for this segment. Required segments ensure that every department has a complete GL string.
Note: A segment cannot be deleted if any of its values are currently assigned to departments. You must remove all department assignments for the segment's values before deleting it.
Managing Segment Values
Each GL segment has a list of allowed values that can be assigned to departments. To manage values, click the values icon next to a segment on the GL Strings page.
-
Code: A short identifier that appears in the composed GL string (e.g., "1000", "50").
-
Name: An optional description for the value (e.g., "General Fund", "Marketing"). This helps users identify values when making assignments.
-
Display Order: Controls the order values appear in the dropdown when assigning values to departments.
-
Available: When enabled, the value is available for new assignments. Marking a value as unavailable will hide it from new assignments but preserve any existing department assignments. This is useful for phasing out a GL code without disrupting current assignments.
Note: A value cannot be deleted if it is assigned to one or more departments. Remove all department assignments first, or mark the value as unavailable to prevent new assignments.
Assigning GL Values to Departments
Once segments and values are defined, you can assign GL values to individual departments. Navigate to a department and select the GL String tab to view and update its assignments.
Each defined GL segment is displayed with a dropdown of available values. Select the appropriate value for each segment and save. The current composed GL string is displayed at the top of the page for reference.
-
Inheritance: Child departments inherit GL values from their parent department. If a department does not have a value assigned for a given segment, it will use the nearest ancestor's value. Select "None" to inherit the value from an ancestor department. The inherited value and its source department are shown in the dropdown for reference.
-
Effective Dating: GL value assignments are effective-dated, allowing you to change GL coding over time while preserving historical assignments.
Department Workspace
The department workspace provides a summary view of position data scoped to a specific department and its children. It is accessible from the main navigation under "Departments" and displays the same summary metrics as the position summary, but filtered to the departments you have access to.
Workspace Summary
The workspace displays a department table with columns for Positions, FTE, Position Cost, Incumbent Cost, and Headcount. Position Cost reflects the cost calculated from position wage rates, while Incumbent Cost reflects the cost calculated from incumbent wage rates. When a forecast scenario is active, columns are grouped into Approved, Scenario, and Change sections for side-by-side comparison.
Department names link to a drill-down view showing positions within that department. A stale badge indicates when positions in a department have changed since the last summary refresh.
Department Position Summary
Clicking a department name in the workspace navigates to a department-specific summary that shows totals broken down by job code. Each job code row displays FTE, Position Cost, Incumbent Cost, and Headcount with the same approved/scenario/change column groups when a scenario is active.
Example Department Trees
FTE Tree's department tree supports any configuration your organization requires. Below are several examples for reference.
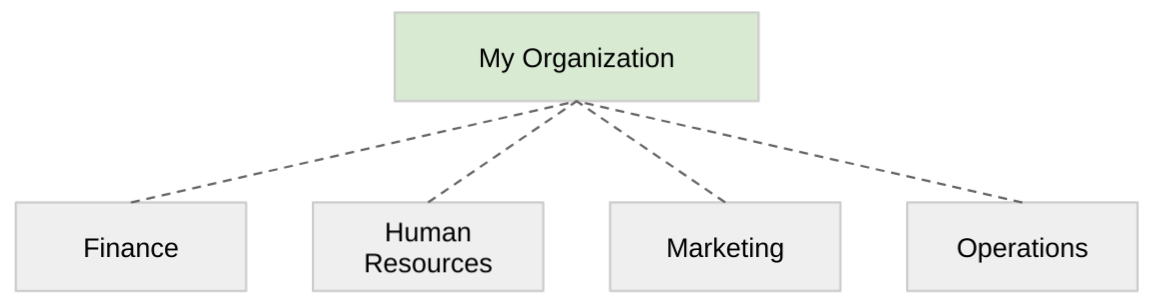
Simple Flat Department Tree
This is the recommended tree for smaller organizations with one level of multiple departments under a single parent department.
-
At the root, "My Organization" serves as the parent department for every other department in the tree.
-
At this level, you can assign approval roles and users. For example, a CFO who must approve each position can be assigned at the "My Organization" level and included in approval workflows. Any approval request from any department will automatically include the CFO.
-
Administrators or leaders who need access to the entire department tree can be given access to "My Organization" and will then be able to view all departments.
-
If you enable the option to add positions to "My Organization," you can still assign positions there if needed.
-
Summary reports will show totals for each department and a total for "My Organization," which includes any positions attached to it as well as those from child departments.
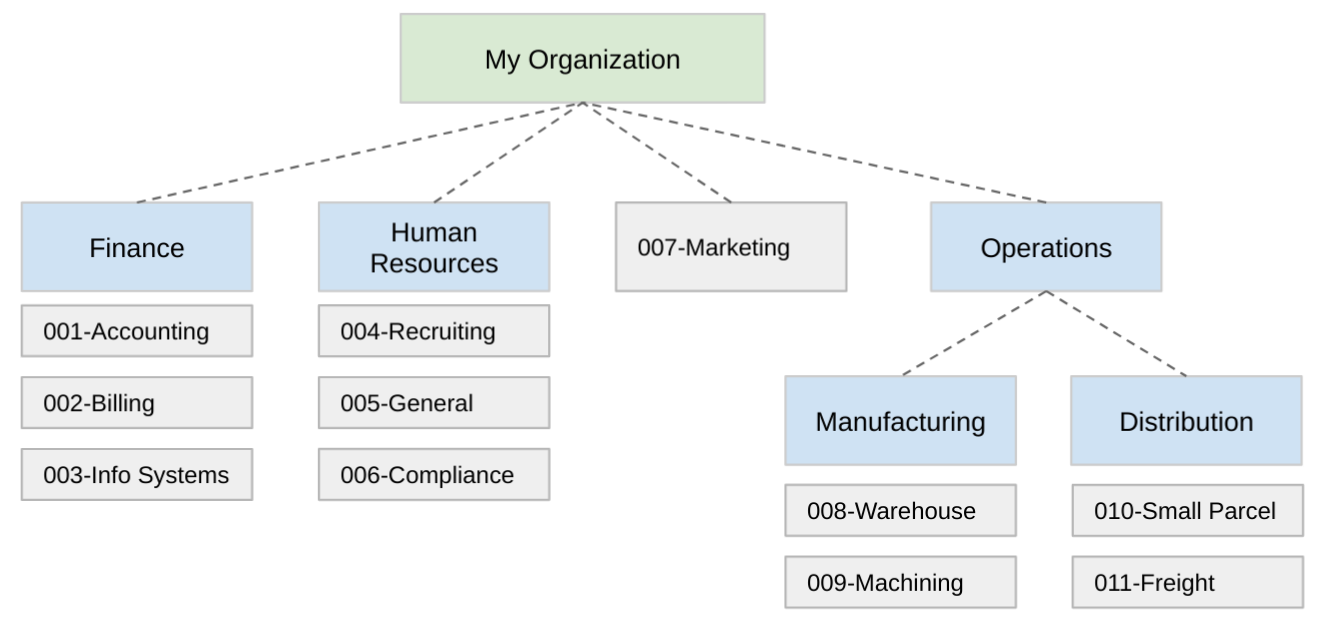
Complex Department Tree
This example demonstrates a more complex department tree with branching, where an organization breaks departments into cost centers.
-
The Finance department contains multiple cost centers (Accounting, Billing, Info System). Positions are assigned to each cost center. A manager assigned to the Finance department would have permissions to all departments under Finance.
-
The Marketing department consists of a single cost center. You can either create a Marketing parent department with a single cost center underneath it or add the cost center directly.
-
The Operations department has two major groups, Manufacturing and Distribution, each with their own child cost centers. The Chief Operating Officer could be assigned to the Operations department role, and any approval request from the four cost centers (Warehouse, Machining, Small Parcel, Freight) would automatically include the COO as an approver.
-
Department role users, job codes, or positions can be added at any level within the department tree.
Need Help?
If you have questions about configuring your department tree, please contact us or email us at support@ftetree.com.